
Page 11 - untitled
P. 11
ADATTATORI DIN 2353 24°
Adaptors DIN 2353 24° • Adapter DIN 2353 24° • Adaptateurs DIN 2353 24° • Adaptadores DIN 2353 24°
Istruzioni di montaggio DIN 3859-2 / Assembly instructions DIN 3859-2 / Instructions de montage DIN 3859-2 / Montageanleitung DIN 3859-2 / Instrucciones de montaje DIN 3859-2
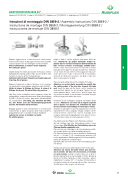
Sbavare leggeremente il tubo all'interno ed all'esterno mantenendo il piano di appoggio (smusso max 0,2x45°) e assicurandosi che non rimangano residui metallici. Oliare le filettature, la sede e l'anello tagliente.
Non utilizzare grassi
Slightly debur the inside and outside of the pipe, without damaging the mating surface (max. bevel 0.2x45°), mak- ing sure to remove all the metal particles.
Lubricate with oil seat, threads and double edge cut- ting ring. Avoid grease.
Èbavurer légèrment le tube à l’intérieur et a l’ extérieur en maintenant le plan d’appui (chanfrein maxi 0,2x45°). Huiler la bague, le filetage de l’écrou, le cône et le filetage du raccord. Ne pas utiliser des graisses.
Das Rohr innen und außen leicht entgraten, wobei die Auflagefläche erhalten bleiben muss (max. Abschrägung 0,2x45°), Stellen Sie sicher, dass keine Metallruckstän- de zuruckbleiben. Den Ring, das Gewinde der Mut- ter, den Konus und das Verschraubungsgewinde einölen. Verwenden Sie keine Fette.
Rebabar apenas el tubo internamente y exteriormente manteniendo el plano de apoyo (bisel max 0,2x45°) y asegurandose que no quedan residuos matálicos. Lubricar las roscas, la cavidad y el anillo.
No utilizar grasas.
Infilare il dado e l'anello tagliente sulla parte finale del tubo. Attenzione: gli spigoli dell'anello doppio ta- gliente devono trovarsi in direzione dell'estremità del tubo. In caso contrario, il montaggio sarebbe errato. Inserire il tubo fino al suo arresto nel raccordo e serrare manualmente il dado fino al totale avvitamento. Stringere con la chiave fino ad ottenere il bloccaggio del tubo, per circa 1 giro e 1/4" o 1 giro e 1/2", ponendo, se necessario, dei punti di riferimento sul tubo e sul dado. Il tubo non deve ruotare assieme al dado.
Place nut and cutting ring on the endside of the pipe.
Attention: to avoid a faulty assembly, be careful that the cutting edges of the ring face towards the tube end. Insert the pipe into the union until it reaches the stop and fully tighten the nut by hand. Tighten the nut with a spanner about 1 and 1/4 or 1 and 1/2 turns, put- ting reference marks on nut and tube if needed. The pipe must no longer turn within the union.
Introduire l'écrue et la bague coupante sur la partie finale du tube. Attentions: les coins de la bague coupante doit se placer à la direction de l'extrémité du tube. En cas contraire l'assemblage ne serais pas correcte. Introduir le tube dans le raccord jusqu’à butée et serrer manuellement l’écrou jusqu’au serrage complet. Serrer l’écrou d’environ 1 tour et 1/4, 1 tour 1⁄2, en posant, si né- cessaire, des points de signalisation sur le tube et l'écrou. Contróler que le tube ne tourne pas avec l’écrou.
Die Mutter und den Ring bis zum Rohrende schieben Auf die richtige Lage des Schneidrings achten, sonst Fehlmontage. Die Schulter des Schneidrings muss der Überwurfmutter zugekehrt sein.
Das rohr bis zum Anschlag in die Verschraubung einfüh- ren und die Mutter von Hand vollständig anziehen.
Die Überwurfmutter bis zu einem deutlichen Kraftanstieg um ca. 1 - 1/4 oder 1 -1/2 Umdrehungen anziehen. Ein vorher angebrachter Markierungsstrich erleichtert das Be- achten der Anzahl der Umdrehungen.
Das Rohr darf sich nicht mehr in der Verschraubung dre- hen lassen.
Introducir la tuerca y el anillo hasta el extremo del tubo.
Atención: las aristas del anillo tienen que estar ha- cia el extremo del tubo. De otra manera, el montaje no serà correcto. Insertar el tubo a tope en el racor y apretar manualmente la tuerca hasta el fondo. Apretar la tuerca con la llave, hasta que el tubo se bloque, aproxi- madamente 1 vuelta y 1/4” o 1 vuelta y 1/2”, poniendo, si necesario, puntos de referencia sobre el tubo y la tuerca. Verificar que el tubo no gire con la tuerca.
11
4
